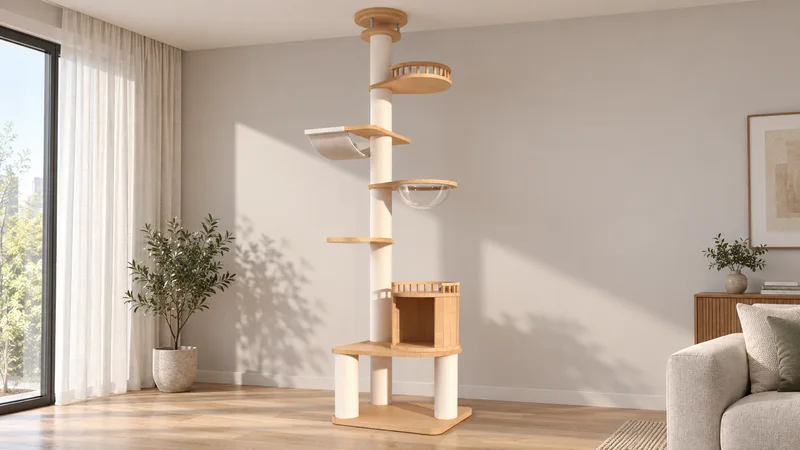
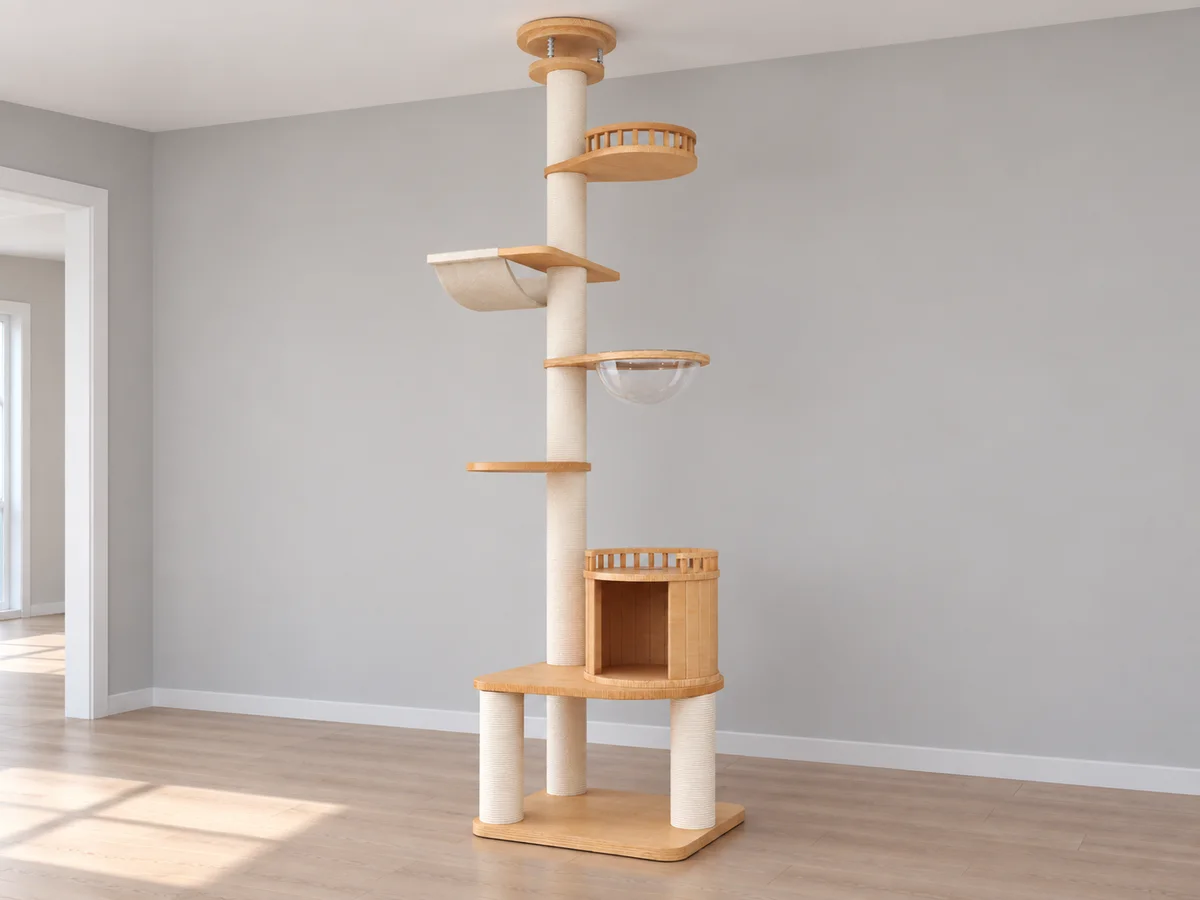
A floor-to-ceiling cat tree should not be selected from a height label alone. The buyer needs to know the finished ceiling height at the intended position, the condition of the contact surfaces, the usable adjustment range of the supplied assembly, and who is responsible for installation. CT-0708-049 is a useful product for building that conversation. Its supplier record lists a 270 cm height field, while the reference image shows a tall central wrapped column, a top ceiling-contact assembly, an open-front lower den, staggered steps, a clear bowl, a hammock, and an upper rail-edged platform.
The visible layout makes the model attractive for a vertical assortment, but it does not establish which ceiling heights the supplied components can accommodate. A single “270 cm” field could describe a nominal configuration, an assembled example, or another supplier convention. Buyers should obtain the actual compatible height range and the adjustment procedure in writing before accepting an order or publishing an installation promise.
Begin with the supplier record, then define the missing installation facts
The current product record provides a starting point for comparison. It does not replace an installation drawing, component list, approved physical sample, or destination-specific instructions.
| Supplier-record field | Recorded value | What the buyer still needs |
|---|---|---|
| Model | CT-0708-049 | Keep this reference on the quotation, sample, assembly guide, component list and carton. |
| Height field | 270 cm | Minimum and maximum compatible finished ceiling height, adjustment allowance and measurement convention. |
| Base field | 60 x 50 cm | Full assembled envelope, including projected platforms and clearance for installation and use. |
| Board field | 18 mm rubberwood | Identify which boards use this specification and confirm the finished sample. |
| Post field | 12 cm solid pine | Clarify whether this is the core or finished wrapped diameter and identify every post section. |
| Capsule field | 40 cm | Define the measured points, usable internal dimensions and bowl material. |
| Carton field | 62 x 52 x 50 cm | Final sealed-carton measurement after hardware, protection and instructions are approved. |
| Approximate gross weight | 60 kg | Verified packed gross weight, assembled net weight, handling plan and package count. |
Do not turn the 270 cm entry into a claim that the tree fits all 270 cm rooms. Ceiling finishes, floor build-up and local measurement error can change the available space. The top contact hardware also needs its own defined working range. Likewise, the 60 kg gross-weight field is not a pet capacity, platform rating or assembled weight.
Measure the actual installation point
For an apartment or residential project, record the finished floor-to-ceiling distance at the exact proposed location. Take more than one measurement around the footprint when the ceiling or floor may not be level. Note the measurement date and whether flooring, underlay, ceiling panels or other finishes are already installed. A construction drawing or general room height is not a substitute for the finished measurement at the product position.
The measurement brief should also document skirting boards, coving, suspended ceiling panels, beams, recessed lighting, sprinklers, vents, curtain tracks and other nearby elements. The product reference shows a flat base and a round upper contact assembly on flat surfaces. It does not demonstrate compatibility with sloped ceilings, fragile finishes, uneven floors or obstructed locations. Those conditions require a specific supplier review rather than an improvised adjustment during installation.
Ask the supplier how much clear working space is required around the product while assembling and tightening it. The final footprint is only part of the answer: a long post section may need room to be lifted, aligned or joined. Confirm the longest component and the intended assembly sequence before planning delivery through doors, lifts and corridors.
Request an installation drawing with named components
A useful drawing identifies the base, lower support posts, den body, den roof rail, central column sections, small step, bowl carrier, bowl, hammock platform and textile, upper rail platform, ceiling-contact discs, adjusters, fasteners and any protective pads. It should show the assembled height range, the adjustment point, the intended contact direction and the order in which components are fitted.
Names matter because a phrase such as “top piece” can refer to a wooden disc, a threaded adjuster, a protective interface, or the complete contact assembly. Use stable part numbers in the manual and spare-parts discussion. If an OEM revision changes a board, post, adjuster, pad or connection, update the drawing and compatibility statement rather than carrying the previous instructions into a new version.
The reference image visibly supports discussion of the model's overall form and component locations. It does not reveal internal threads, fastener lengths, torque values, protective-pad material, acceptable surface types, or a verified adjustment range. These belong in controlled technical information from the supplier.
Separate room compatibility from product performance
Room compatibility asks whether the complete supplied product can be installed at the measured location according to the manufacturer's instructions. Product performance asks whether the installed structure meets the buyer's defined requirements. One does not prove the other. A tree may physically span a room height without having documented stability for that exact configuration, surface or use case.
Ask for the evidence relevant to the intended market and sales claims. This may include sample inspection, dimensional checks, assembly trials, stability evaluation or other buyer-defined requirements. The correct scope depends on the product, destination and claim; the source record does not list certifications, load ratings or a test programme. Keep unsupported words such as “secure,” “anti-tip,” “heavy duty” or “safe for large cats” out of the product page until the required evidence exists.
For a project order, define who approves the room condition, who assembles the unit, who performs the final checks, and what record is retained. A simple installation record can identify the model and revision, location, finished height measurement, visible condition of contact surfaces, components used, completion date and responsible party. The supplier should define the actual installation and post-installation checks.
Plan customer information before listing the product
An ecommerce or retail page should state the confirmed compatible ceiling-height range, not only the nominal height field. Explain that buyers must measure the intended position and review the ceiling and floor conditions specified in the instructions. Show the complete product from base to top contact, plus close views of the supplied contact assembly and adjustment area taken from the approved sample.
Keep room photography honest. A styled scene can communicate the narrow vertical format, but it cannot confirm the pictured ceiling height or completed installation. The generated scenes in this article preserve the product reference for early presentation; they are not photographs of a fitted sample and do not demonstrate stability, surface protection or installation quality.
Customer support also needs a model-specific response for rooms outside the approved range, missing components, damaged contact surfaces and questions about relocation. Do not encourage improvised spacers, substituted hardware or unapproved ceiling attachment. Route those cases through the instructions and supplier support process.
Review the visible product zones
Although installation fit is the main topic, CT-0708-049 also needs ordinary product review. The lower zone combines a raised platform and an open-front rounded wooden den with a rail around its roof. Above it, the reference shows a small projecting step, a clear bowl, a hammock platform, an upper rail-edged perch and the ceiling-contact section. Request usable dimensions for each resting area and clear vertical distances between levels.
Confirm the den construction, bowl material and fixing, hammock textile and attachment, rope fibre, wood finish, supplied hardware and care instructions. The supplier record identifies rubberwood boards and solid-pine post fields, but does not settle every visible or hidden material. The quality-control brief should map each approved feature to a measurable or visual acceptance point.
A practical RFQ checklist
- Reference CT-0708-049 and the exact product revision.
- Provide the destination market, intended sales channel and expected quantity.
- Give the finished height measurements and photographs of the proposed floor and ceiling surfaces.
- Request the confirmed compatible height range and complete assembled envelope.
- Request the installation drawing, component list, assembly sequence and supplier-defined final checks.
- Confirm the material schedule, finish, bowl, hammock, rope, fasteners, contact parts and protective interfaces.
- Confirm the final package count, carton dimensions, packed weights, longest part and handling requirements.
- Agree sample-review evidence, acceptance criteria, instructions, warnings and replacement-component terms.
The recommendation
CT-0708-049 is worth shortlisting when a range needs a visually substantial floor-to-ceiling cat tree with several distinct resting zones and a lower wooden retreat. Its recorded 270 cm height gives the buyer a question to resolve, not a universal room-fit promise. A strong product launch starts with measured installation locations, a documented adjustment range and model-specific instructions.
Send an enquiry with your ceiling measurements, room conditions, target market and order estimate. That allows the sourcing team to confirm which information and sample checks are needed before the model enters a retail or project-order specification.